
“You don’t take a photograph, you make it.”
― Ansel Adams
This is the seventh publication of a series in which I’m addressing the topic of black-and-white. The series include posts and videos that can be easily located by using the tag “learning-black-and-white” either in the search box above, or by directly clicking on the tag name at the bottom of this post. Also, here is a link to the entire series so far.
So, in this post, I’ll talk about post-processing digital black-and-white photography. There are multiple ways to convert a color image to black-and-white. Assuming you’re shooting RAW, those options can go from a simple desaturation process in either Camera Raw, Lightroom, or Photoshop all the way up to using a more complex workflow including several tools to create more professional looking black-and-white images.
So, the goal of this post is not to cover all multiple available options to convert images to black-and-white, but to analyze an end-to-end workflow that, either you can apply from beginning to end, or that you can use partially according to the goals that you have set for your image.
The workflow I’ll describe encompasses three phases to convert a digital color image to black-and-white:
- Phase 1: Color image preparation
- Phase 2: Black-and-white conversion
- Phase 3: Luminosity adjustment and image fine tuning.
Let’s take a look each of them.
Phase 1: Color image preparation.

First of all, it’s important to understand that in digital black-and-white photography unless you shoot black-and-white in-camera images with an specialized camera — that as we discussed in one of the first posts of this series, is out the scope of the series — a black-white-image is always the product of the conversion of a color image. So, from that perspective how colors are converted into grey tones is critical in order obtain optimal results.
The first step in this phase consist on inspecting the image from the perspective of the colors of the different elements of the image. So, the goal is to have a color image with enough color separation among the elements of the image — such as subject, and other support elements — in order to obtain a monochrome image where the different elements of the image can be perfectly differentiated even when converted to grey tones, so the monochrome image doesn’t look like washed-out.
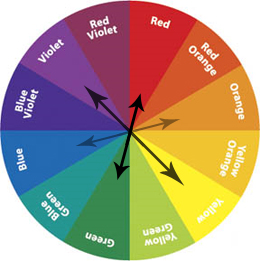
To illustrate the point please take a look to figure 1, other than the square crop, this is the original image captured in-camera, the subject is mostly red (washed red) and the background is mostly dark green. These two colors are complementary (see color wheel in figure 2) which means that in a black-and-white conversion they will be converted in tones of grey with a good range of separation.
Now, let’s suppose for a moment that the background (the water behind the flamingo in figure 1 ) is not green, but orange — that would be totally possible if the photo is taken during sunset/ sunrise hours — well, in that case, the overall color of the flamingo and the background would be so close (see color wheel in figure 2) that in order to obtain a good grey tone separation between subject and background, we would have to alter probably the background color, either using Photoshop or any other image editor of your preference. As part of this series, I’ll record several videos in which I’ll walk you through the detailed process using several of my own images, in those videos I’ll show you among many other things how to alter colors using Photoshop, for now let’s focus on understanding the overall process.

Now, let’s get back to image in figure 1. As we discussed earlier, color separation between subject and background is good, actually colors are very close to the real ones, white balance is reasonably close too. So, overall this is a good color image. A direct conversion of this image to black-and-white would most likely produce a monochrome image with a good grey tone separation between subject and background, but most likely a flat image. The reason is simply because given the absence of color in monochrome, brightness becomes so important — in the other hand higher levels of saturation make a color look brighter. So, in general color images to be converted to black-and-white should be more saturated than normal, in this way the resulted monochrome image will have a richer tonal-range given the higher levels of brightness (luminosity) inherited from the color image.
Now, figure 3 shows a brighter, more contrasting, and a bit more saturated color image, that if converted to black-and-white would result in a richer tonal-range, monochrome image.
Adding color brightness can be achieved by simply increasing image saturation — please note that increasing image saturation can also change the overall white balance of the image, however at this point in time of the workflow, it’s not that relevant, given that this color image version is just a transition image in order to create a monochrome one. Now, increasing saturation can be as simple as a couple of commands in Photoshop, or as complex as using a plugin software such as Color Efex Pro in order to have more control over the saturation approach. So, as mentioned above, in subsequent videos that I’ll record as part of this series, I’ll go through some examples showing pros and cons of each method.
Phase 2: black-and-white conversion
In this second phase the goal is to convert a color image — previously prepared according to phase 1 guidelines — to a black-and-white image. As previously mentioned, there are many ways to convert a color image to black-and-white, for example having a good color image — with the right levels of color brightness and color separation — you can use the Convert to Grayscale option in Camera Raw — go to the HSL/ Grayscale tab, click on Convert to Grayscale, and use the sliders to manipulate how colors will render into grey tones — and probably obtain a good monochrome image. You can do the same in Lightroom.
Photoshop offers at least three different possibilities to convert a color image to black-and-white: you can use the Black and White option (go to Image, scroll down to Adjustments, then select Black and White), or you can use the Channel Mixer (go to Image, scroll down to Adjustments, then select Channel Mixer), or even the Hue/ Saturation option (go to Image, scroll down to Adjustment, then select Hue/ Saturation) this latter probably doesn’t make much sense in this particular workflow given the preparation of the color image (phase 1) is partially based on increasing the color image saturation.
So, the point is that you have plenty of options to convert a color image to black-and-white. But, when it comes to prepare professional looking black-and-white images, my recommendation is to consider a specialized plugin software in order to do so. There are several plugins you can use to convert images to black-and-white such as Exposure by Alien Skin Software, B&W Effects by Topaz Software, Perfect Black and White by OnOne Software, and others, even some free software options. However, Silver Efex Pro by Google currently stands out from the rest because of its completeness of tools and presets. Later on, as part of this series, I will publish a complete assessment of all available options in the market, but for now let’s focus on the one that stands in many aspects over the rest of the pack: Silver Efex Pro.
In addition to the traditional options to control color filters as well as options to control sharpness, contrast, etc. offered by all black-and-white conversion plugins, Silver Efex Pro offers the U Point Technology (Control Points) which is a selective method — a Google patent — that works as an alternative to emulation of traditional dodging and burning, that allows to create precise selections without using complex Photoshop masks. Also, the collection of presets presented by Silver Efex Pro includes a broad range of emulation of popular film types that you can use as starting point for your image conversion.
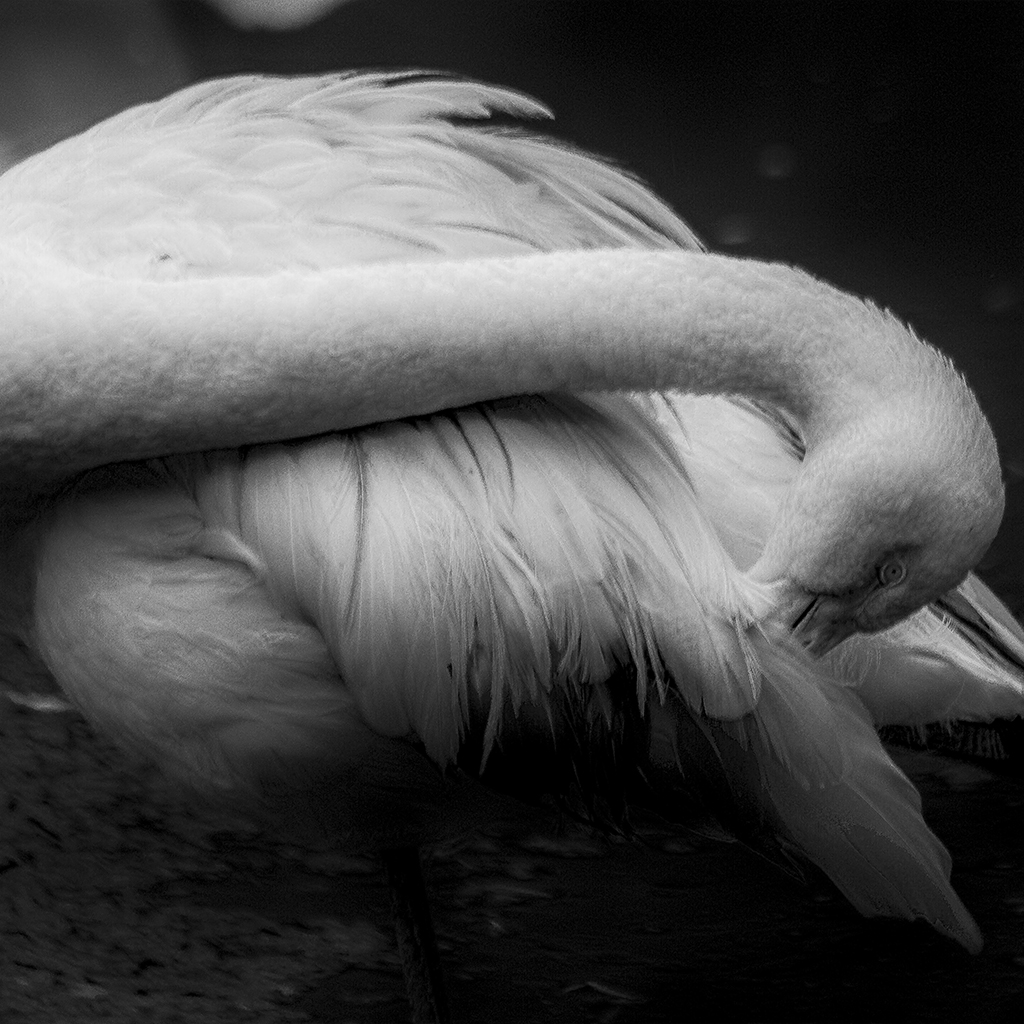
Figure 4 illustrates an image converted with Silver Efex Pro. As you can note, this is a very good black-and-white image — many photographer would consider this the final version. However, one of the aspects in which usually Silver Efex Pro as well as the other plugins fall short is tonal range. So, in the next phase of this workflow I’ll explain how to improve the monochrome tonal range of an image.
Phase 3: Luminosity adjustments and image fine tuning
Luminosity is one of those topics that Photoshop experts like to ramble, and ramble about it. However, to add the right levels of luminosity to an image can be as simple as #1 selecting pixels based on its luminosity (brightness), #2 create a mask layer (luminosity mask) based on the selection, and #3 blend that mask using the most appropriate blend mode in Photoshop — usually Overlay or Soft Light blend modes do a good job.

Here is a link to a good step by step tutorial describing the process I just mentioned earlier. Obviously, there are much more complex ways to create selections based on luminosity values, but unless you’re extremely purist, the process described above will give you excellent results that is you need to, you can fine tune manually using the Doge and Burn tools — this is what I usually do.
Take a look to the image in figure 5, this is the final image, besides applying the luminosity mask (as described in the previous paragraphs), I invested a good number of hours fine tuning the image using the Dodge and Burn tools until I got this appearance, that is pretty close to my initial visualization of the image. So, this is what I call the fine tuning process (a.k.a. going beyond Silver Efex).
In the next post of this series I’ll talk about using toning and split-toning in black-and-white images. Let’s keep in touch.
I do appreciate your comments and suggestions. If you are interested in more information regarding the making of my images, as well as general information about black-and-white photography, please subscribe to my blog to receive automatic notifications every time I publish a new post.
Website – http://www.enrique-pelaez.com/
Instagram Page – https://www.instagram.com/enrique.pelaez.houston/?hl=en
Facebook Page – https://www.facebook.com/EnriquePelaezPhotography
Google Plus – https://plus.google.com/u/0/+EnriquePelaez
