
Photography takes an instant out of time, altering life by holding it still.
Dorothea Lange”
This post is the third part of the “Capturing black-and-white images” topic. The topic is part of my series “Learning black-and-white photography”. If you missed either the first post or the second post you can read the first one here, and the second one here.
The series will include posts and videos that can be easily located by using the tag “learning-black-and-white” either in the search box above, or by directly clicking on the tag name at the bottom of this post.
As stated in the first post, the goal of this topic is to provide some advice in order to start shooting images with the idea of convert them to black-and-white.
I broke down the topic in three different posts that correspond to the three aspects that I recommend to keep in mind when shooting black-and-white image:
- Understand exposure
- Using filters to improve image quality, and
- Shooting RAW images.
In this third post I will cover the the topic shooting RAW images. So, let’s get started.
Shooting RAW images.
In most digital cameras today, you have basically two options to storage the image captured with the camera: JPEG and RAW. JPEG (Joint Photographic Experts Group) was defined in 1992, and quickly became the industry standard for the compression of digital images either taken with a camera, or digitized by any other medium such an scanner. JPEG files are of a relative small size, and can be easily transmitted online. JPEG files are also the standard for online images, news reports, etc. that most of the time don’t require any subsequent post-processing.
A RAW file is a larger, uncompressed file that records every piece of data captured by the camera sensor, they come in different non-standard formats — usually every camera maker implements its own standard — that requires specialized software to be converted before you can really see the image.
So, the question in your mind is perhaps, given all the hassles that handling RAW files represent, why should you bother shooting RAW files? In order to answer that question, I believe it’s fair to say that there are some exceptions to the “Always shooting RAW” rule. If you’re an sport photographer, especially if you’re shooting fast-action sports, you need to shoot in continuous mode, and hold the shutter button meanwhile the action takes place, so that way you’ll take advantage of the maximum number of frames per second that your camera is able to shoot, the smaller the image the less probable the camera buffer starts being the “bottleneck”. So, in this case shooting JPEG clearly represents an advantage, however it’s difficult for me to think in another example in which it makes sense to shoot JPEG. So, as I don’t think sport photographers need to convert images to black-and-white, we can safely assume that for black-and-white “Always shooting RAW” is an universal rule.
So, there are several reason why shooting RAW is important, however I’d group those reasons into two groups of benefits: firstly, latitude and secondly, non-destructive editing, let’s take a look to each of them.
Latitude. lat·i·tude ˈladəˌt(y)o͞od/ : scope for freedom of action or thought.
In previous posts we talked about the importance of getting the right exposure in-camera, well even though I always strive to do so in every situation, the fact of the matter is that circumstances not always allow me to get the exposure I need, there are times in which I have to quickly use my camera without thinking that much on the setup values I´m using. So, when you shoot RAW, you have some freedom of action (latitude) in order to correct not just exposure, but also some other vital aspects that influence your image quality such as white balance, sharpening, and last but not least important for black-and-white conversions color and contrast.
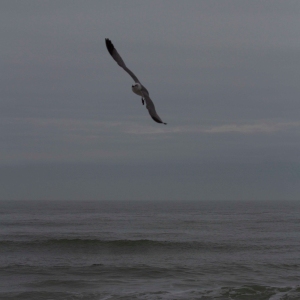
Let’s take a look to the image in figure 1, this is the RAW file of an image I clicked time ago, other than the square crop this is the original shot. So, as you can see the image is noticeably underexposed, the white balance shows a strong blue cast, and last but not least given the image was taken with a digital camera, the sensor tend to blur the image to some degree, so this also requires some correction — please note that when you shoot JPEG files, you probably don’t notice this kind of blur, the reason is simple, the camera automatically sharpens the image to produce the JPEG, this not an ideal solution if you’re planning to print the image, especially if you need a large print.

Now, take a look to figure 2. This is the same image after editing the RAW file using Adobe Camera Raw — later in this post, I’ll talk about the different options you have to edit RAW files. As you can see, the difference is notorious, this basically thanks to the fact that RAW files include all the data captured by the image sensor. Depending on the camera maker, the data can be stored in either a 12 bit or a 14 bit format (a.k.a bit depth), so that represents 2^12 = 4096 different possibilities of tone values per channel, given we have 3 channels (RGB) the total number of different tones values would be 4096^3 = 68.7 billions. If you do the same calculations for 14 bits the result is 4.4 trillions different tone values!! as opposed to 16.8 million tone values for the 8 bits used by JPEG. So, no wonder why colors and tones — that are critical for the transformation to black-and-white — are dramatically enhanced in figure 2.

Non-destructive editing. One of the main advantages of shooting RAW is the fact that you can implement a clean, non-destructive editing workflow. For example, using Adobe Camera RAW, I can always get back to the original image in figure 1 given all the original data captured by the camera image sensor is still there. So, in this particular case the image in figure 2 is an intermediate step in my workflow before converting to black-and-white using Photoshop, however given I used also a non-destructive workflow in Photoshop — we’ll see more about non-destructive workflows in subsequent posts in this series — I have what I call an end-to-end non-destructive workflow, meaning that in any moment I can get back to the original image without loosing data. Figure 3 shows the final black-and-white image.
Probably the question in your mind now is, how can I edit a RAW file? well, you basically have three different options. Usually camera makers provide a proprietary software to edit RAW files, for example Canon provides the Digital Photo Professional image processing software that allows you to edit proprietary Canon RAW files, usually the proprietary software provided by the camera maker is very basic, but a good start if you don’t have any other option. The second and third options are Adobe Lightroom and Adobe Camera RAW. They both provide basically the same set of features to edit RAW files, and they both support a wide variety of RAW proprietary formats: Canon, Nikon, Sony, Olympus, Pentax, etc. Here’s a link to the Adobe supported RAW proprietary formats. Actually, there is a fourth option that I’d recommend to research in case you’re under a restrictive budget, that option is open source software, there are a number of applications that do a good job editing RAW camera files, my personal experience with open software is limited, however is fair to say that open source is definitely an option too.
Finally, in my opinion the best way to really grab the concept of “why shooting RAW is so important”, is to actually practice, so hopefully this post gave you enough information to start shooting RAW.
In the next post of this series I’d start a discussion on post-processing black-and-white images. Let’s keep in touch.
I do appreciate your comments and suggestions. If you are interested in more information regarding the making of my images, as well as general information about black-and-white photography, please subscribe to my blog to receive automatic notifications every time I publish a new post.
Website – http://www.enrique-pelaez.com/
Instagram Page – https://www.instagram.com/enrique.pelaez.houston/?hl=en
Facebook Page – https://www.facebook.com/EnriquePelaezPhotography
Google Plus – https://plus.google.com/u/0/+EnriquePelaez
