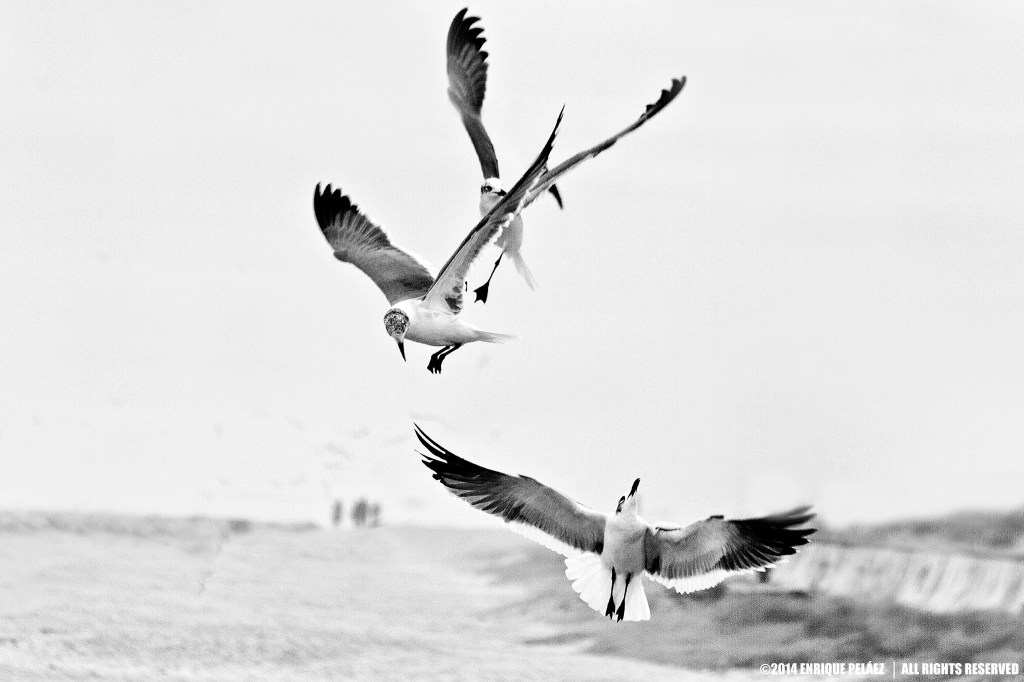
Image Title: Dance of Life
Inspired by George Carlin’s quote “Those who dance are considered insane for those can’t hear the music”
Vision
This image is part of series I’m working on about birds. Birds are fascinating animals and so frequently the subject of different kind of art including photography. Unfortunately I’ve no time to go to places where I can click birds in the wild, so I’ve tried to catch them as part of the urban scene such as seagulls or pelican in beaches, crows standing on electric wires, the zoo, and even some Houston’s close by natural reserves.
This image is then about reflecting that natural coexistence between man and birds. Obviously the subject are the three birds making those nice twirls in the first plane. The blurred background dimly suggests a group of people walking down the shore that I believe support the man/ animal coexistence vision I want to convey.
When I clicked this image it caught my eye the three birds making those nice pirouettes in the air, resembling a kind of a dance or ritual perhaps celebrating life.
Craft
In-Camera details
The first critical aspect to get good flying birds images is to be able to free the action so you can catch birds in the air as their best as the ones in this image making those nice pirouettes. In my experience there are three factors that are critical to freeze the action:
- First of all shutter speed, anything between 1/800 sec and 1/1000 sec is good to freeze the image and still get a decent aperture. Now I’m assuming you’re using a regular telephoto lens such as the Canon 70-300mm f/4-f/5.6 however if you are able to invest in a faster lens let’s say a 300mm f/2.8 telephoto zoom lens you might be able to shoot faster than 1/1000 sec. (probably all the way up to 1/4000 sec,) and still get good quality shots.
- The second aspect that I believe is equally important is AF (Auto Focus), in Canon Cameras there are three auto focus (AF) modes: One Shot, AI Focus and AI Servo. “One Shot” locks the focus when you half press the shutter, “AI Focus” is Canon attempt to figure out if the subject is moving or stationary normally used in automatic mode and ¨AI Servo¨ is intended to track moving subject continuously so, obviously AI Servo is the one to use.
- The third important aspect is to shoot in continuous mode. Remember that birds are animals that move fast so it’s not just of a matter of freezing one image but a sequence of images so you can pick for post processing the best ones. I’ve found the Canon 7D is a body nicely suited to do the job with its 8.0 frames per second continuous shooting. Don’t forget that the bottleneck to achieve the 8.0 fps is the memory card you’re using so you need a fast memory such as the SanDisk Extreme Pro 90MB/s or at least 60MB/s. .
The three aspects above are the most critical ones to be considered however what is more important than anything is that you develop your own approach by going out and practice, take these three aspects as a starting point and go ahead and shoot as many birds as you can (photographically speaking)
Post-Processing
As you can expect my post-processing work is very oriented to produce Fine Art Images as opposed to commercial images or other kind of photography, so you don’t have to do everything that I do, take these steps as a set of recommendations that can help you improve your photography and apply those aspects that make sense for the kind of photography you want to develop.
For black and white work I use three post-processing programs that are part of my workflow for practically all my images: Adobe Camera Raw, Photoshop and The Nik Collection. Below a description of what I do in each of these
Adobe Camera Raw. This is a Photoshop plug-in (today available as standalone componEnt and as a filter with available versions of Photoshop CC) that allows to work RAW files (a.k.a. “Digital Negatives”) through which you have a greater artistic control and flexibility while still maintaining the original raw files. I shoot RAW, so the first step in my workflow is to make general adjustment in Adobe Camera Raw. Particularly for this image I added aprox ⅓ of stop exposure and well as some saturation, vibrance and clarity (btw those are the parameters that I usually played with in the majority of my images). Now if your original shoot is under or over exposed you have some latitude to play with in the RAW file using the Exposure, Highlights, Shadows, Whites and Blacks sliders (not the case for this particular one).
Now, in practically all my works I use two products of the Google Nik’s Collection: Color Efex Pro and Silver Efex Pro. So, a good question that I know can come to your mind now is why if my images are black and white I use a color plug-ins such as Color Efex Pro in my workflow, well the answer has to do with Tonal Range, in digital black and white photography one critical aspects is to start the black and white conversion with a color image with a rich color tonal range that will render into a richer set of monochromatic tonal values which is usually something desirable in monochromatic images.
Color Efex Pro — Particularly for this image I used a ¨Tonal Contrast¨ preset and on top of that I stacked a Graduated Neutral Density preset.
Silver Efex Pro — I used the ¨High Key Preset¨ and I added some control points basically to avoid the birds to become too white because of the high key effect.
Finally I made some selective exposure adjustment in Photoshop CC (using the burn and dodge tool) and cloned out some distracting elements in the background.
I do appreciate your time to read this post, if you are interested in more information regarding the making on my images please subscribe to my blog to receive automatic notifications when I publish a new one.
Website – http://www.enrique-pelaez.com/
Facebook Page – https://www.facebook.com/EnriquePelaezPhotography
Google Plus – https://plus.google.com/u/0/+EnriquePelaez
